この記事を見れば「コピペ」のみでブログにメニューバーを追加する事ができます。
メニューバーはブログの下の図の黒いバーの部分です。

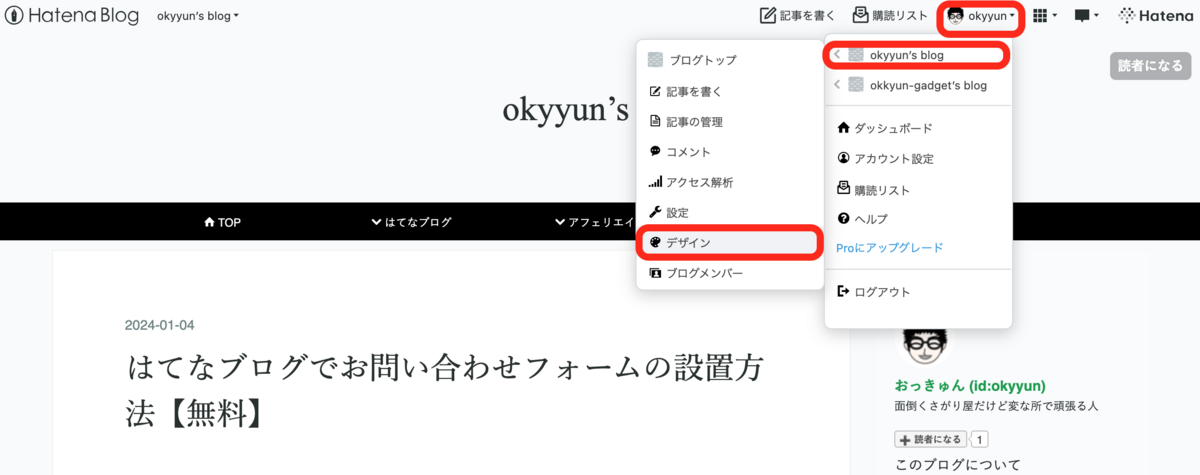
STEP1:自身のアカウント名を選択してデザインをクリックします。
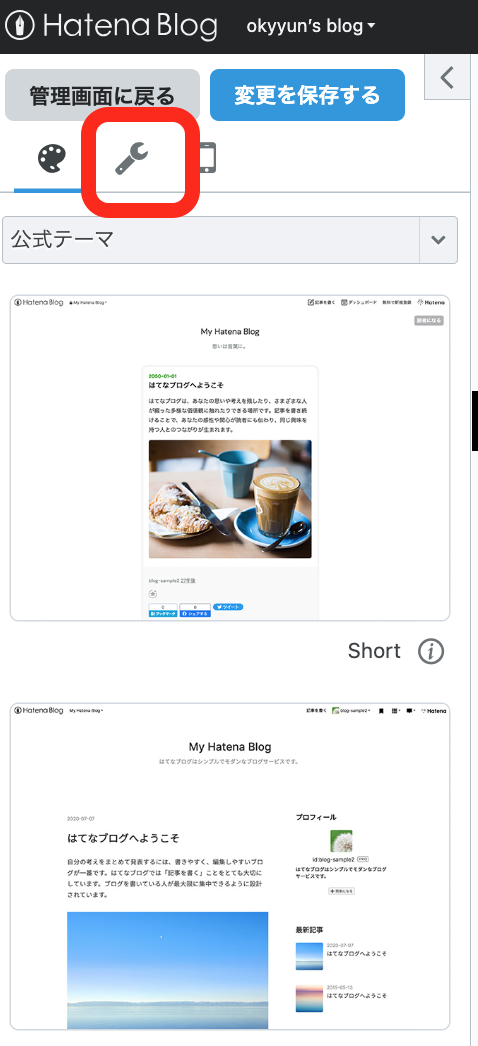
STEP2:レンチ「🔧」マークをクリックします。
STEP3:「ヘッダ」をクリックして、その下の「ブログタイトルの下」の枠内をクリックします。
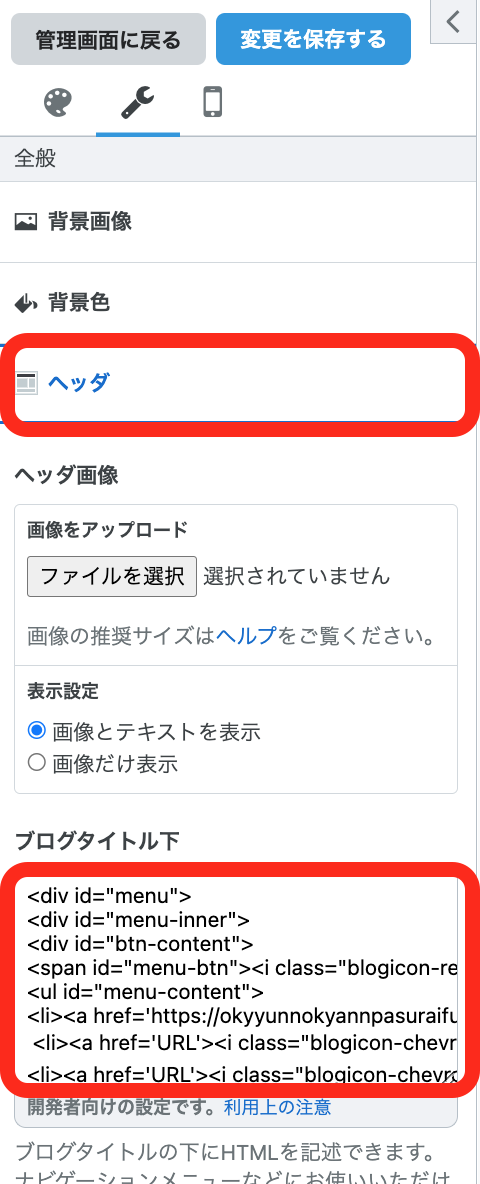
STEP4:表示された全般の赤枠に下記を貼り付けます。

ーーーーーーーーーーーー以下を貼り付けてください。ーーーーーーーーーーーーーー
<div id="menu">
<div id="menu-inner">
<div id="btn-content">
<span id="menu-btn"><i class="blogicon-reorder"></i> MENU </span></div>
<ul id="menu-content">
<li><a href='https://okyyunnokyannpasuraifu.hatenablog.com/archive'>
<li><a href='URL'><i class="blogicon-chevron-down"></i> はてなブログ</a></li>
<li><a href='URL'><i class="blogicon-chevron-down"></i> アフェリエイト</a></li>
<li><a href='URL'><i class="blogicon-chevron-down"></i> レビュー</a></li>
<li><a href='https://docs.google.com/forms/d/e/1FAIpQLSeA2Zz4-05SIRrnCG3n5t6kTO93brzXJU2d7NGoCJ5oOhoJQA/viewform'>
<div style="clear:both"></div>
<script type="text/javascript" src="https://code.jquery.com/jquery-1.9.1.min.js"></script>
<script>
$(function(){
var menuBtn = $("#menu-btn"),
menuContent = $("#menu-content");
menuBtn.click(function(){
menuContent.slideToggle(); });
$(window).resize(function(){ var win = $(window).width(),
p = 960;//19
if(win > p){ menuContent.show();
}else{ menuContent.hide(); } });});</script>
STEP5:表示された全般の赤枠に下記を貼り付けます。
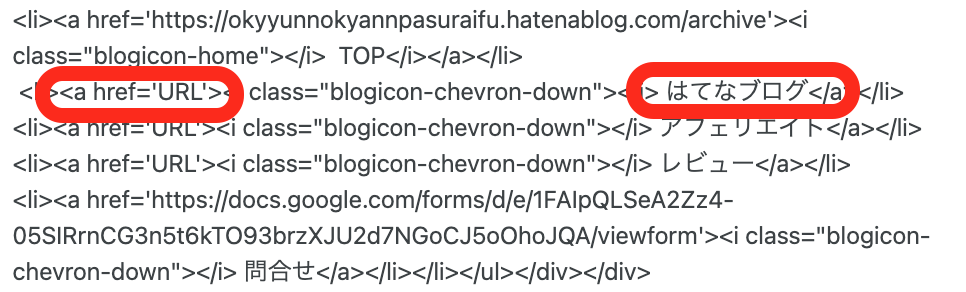
’URL’の部分にURLを貼り付けます。
「TOP」、「はてなブログ」、「アフェリエイト」、「レビュー」、「問合せ」の部分を好きな名前に変えてください。
STEP6:「デザインCSS」をクリックして、その下の赤枠内をクリックします。
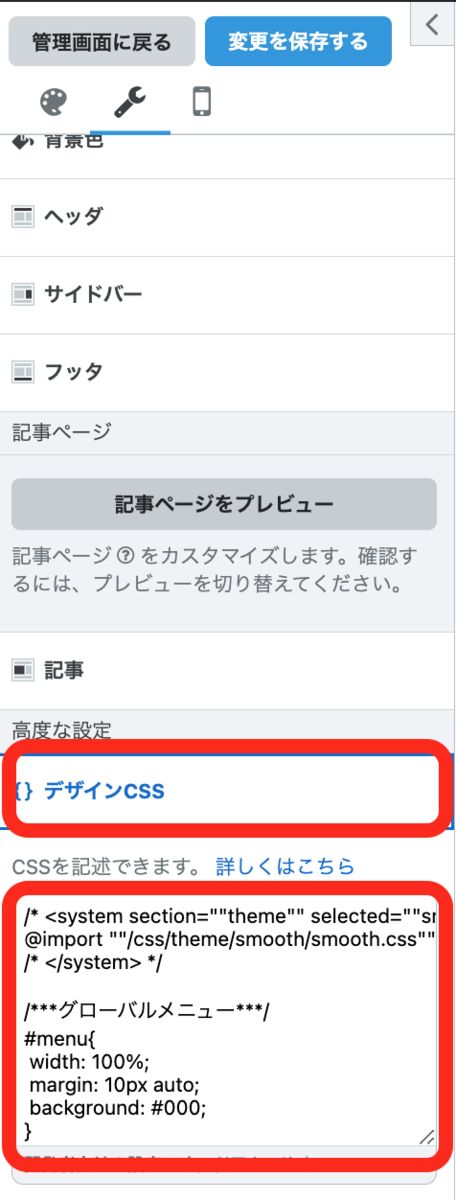
STEP7:表示された全般の赤枠に下記を貼り付けます。

ーーーーーーーーーーーー以下を貼り付けてください。ーーーーーーーーーーーーーー
/* <system section=""theme"" selected=""smooth""> */
@import ""/css/theme/smooth/smooth.css"";
/* </system> */
/***グローバルメニュー***/
#menu{
width: 100%;
margin: 10px auto;
background: #000;
}
#menu-inner{
width: 1000px;
height: 40px;/*メニューバーの太さ*/
margin: 0 auto;
background: #000;/*メニューバーの背景色*/
}
#menu-btn{display: none;}
#menu-content{
padding-left: 0;
margin: 0;
width: 100%;
height: 100%;
list-style-type: none;
}
#menu-content > li{
position: relative;
float: left;
height: 100%;
text-align: center;
width: 20%
}
#menu-content > li > a{
position: relative;
display: block;
height: 100%;
width: 100%;
line-height: 40px;/*メニューバーの太さ*/
background: #000;/*文字の背景*/
color: #fff;/*文字の色*/
font-size: 70%;
text-decoration: none;
z-index: 2;
}
#menu-content > li > a:hover{
background: #fff;/*選択時の背景色*/
color: #ff1493;/*選択時の文字色*/
}
/***横幅が狭いときのメニュー***/
@media screen and (max-width:960px){/*19*/
#menu-inner{
width: 100%;
height: auto;
}
#btn-content{text-align: right;}
#menu-btn{
display: inline-block;
padding: 8px 15px;
margin: 5px;
cursor: pointer;
background: #000;
color: #fff;
font-size: 70%;
}
#menu-content{
display: none;
width: 100%;
}
#menu-content > li{
width: 50%;
height: 40px;
}
#menu-content > li > a{
width: 100%;
line-height: 40px;
padding: 0;
text-decoration: none;
}
/*目次*/
.entry-content .table-of-contents {
position:relative;
margin-left: 0;
padding: 15px 10px 15px 35px; /*枠内の余白(上右下左) */
font-family:sans-serif,cursive;
font-size: 80%; /* 文字の大きさ */
font-weight:normal;/*文字の太さ*/
list-style-type:decimal;
background:#f0f8ff;/*枠内の色*//*1*/
/*外枠 太さ デザイン*/
border-top:40px solid #191970;/*2*/
border-bottom:3px solid #191970;/*枠線下*//*2*/
border-left:3px solid #191970;/*枠線左*//*2*/
border-right:3px solid #191970;/*枠線右*//*2*/
line-height: 250%; /*行間*/
border-radius: 3px; /*外枠の角を丸くする*/
color:#1e90ff; /*数字の色*//*3*/
}
/*大見出しの見え方*/
.entry-content .table-of-contents li {
list-style-type:decimal;
font-weight: bold;
}
/*中見出しの見え方*/
.entry-content .table-of-contents li ul li {
font-weight: normal;
}
/*「目次」の周囲変更*/
.entry-content .table-of-contents::before {
content:"目次";
display: block;
font-size: 150%;/*文字サイズ*/
font-weight: normal;/*文字太さ*/
position: absolute;
top: -35px;/*上からの位置*/
left: 30px; /*左からの位置*/
color: #fff!important;/*文字色*//*4*/
}
/*リンクの色変更と下線を消す*/
.entry-content .table-of-contents li a{
color:#3333ff; /* 目次リスト部分のテキスト色 *//*5*/
}
.list01 {
counter-reset:number; /*数字をリセット*/
list-style-type: none!important; /*数字を一旦消す*/
padding:0.5em;
background: #f9fff5;
}
.list01 li {
position: relative;
padding-left: 30px;
line-height: 1.5em;
padding: 0.5em 0.5em 0.5em 30px;
}
.list01 li:before{
/* 以下数字をつける */
position: absolute;
counter-increment: number;
content: counter(number);
/*以下数字のデザイン変える*/
display:inline-block;
background: #4abdac;
color: white;
font-family: 'Avenir','Arial Black','Arial',sans-serif;
font-weight:bold;
font-size: 15px;
border-radius: 50%;
left: 0;
width: 25px;
height: 25px;
line-height: 25px;
text-align: center;
/*以下 上下中央寄せのため*/
top: 50%;
-webkit-transform: translateY(-50%);
transform: translateY(-50%);
}
STEP8:画面左上の変更を保存するをクリックします。
これで完了です。
ブログの見た目がかっこよくなること間違いなしです!
皆さんの参考になれば嬉しいです。
参考にしたサイト: